How To Improve Your Writing And Productivity With Word AutoCorrect
This is a repost from April 2008 … Randy Ingermanson mentioned how handy this technique can be in his latest Advanced Fiction Writing E-Zine, and I thought I’d share how to do it for free.
So read on … the following tip will not only IMPROVE YOUR WRITING, but also IMPROVE YOUR PRODUCTIVITY!
As part of the 2008 Genesis contest, one of my judges pointed out that I used the word “was” way too often. Instead I should have chosen better verbs.
So I took my work in progress and I used the find dialog to locate all the offending instances of “was” (using the “highlight all items found in” option), and then highlighted them green. When I scanned my document, I found the judge was right! The little weasels had snuck into my text and had hidden themselves everywhere!
Fixing these existing instances is one thing … I can do that as I revise the first draft. But how to prevent them in the future—that is the question!
I tried to mentally catch myself as I wrote, and found it very difficult. The little buggers just wanted to pop out of my fingers and jump onto the keyboard!
So here is the solution I found. There is a way in Microsoft Word to auto-highlight offending words as you type them. REALLY!
Click the Read More button below to see the tutorial on how I did it.
(Note … if you own Word 2007 or later, make sure to read the end of this blog post where I cover how to access the AutoCorrect feature using the new menu system.)
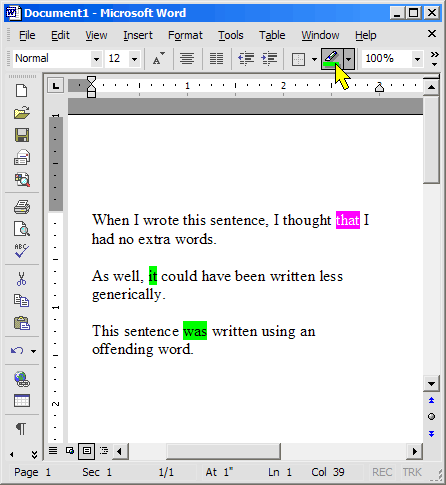
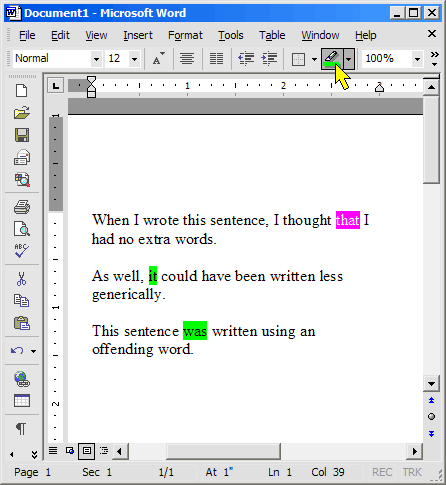
The first step is to find one of those words that you want to avoid typing, type it in, and then highlight it. To highlight it, you first select it (double-click on it), and then click the highlight button. In the screen capture below, I have “that” highlighted, and I have just colored it bright green.
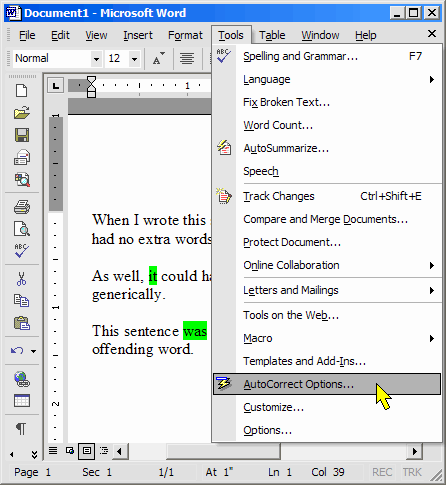
Next, you want to bring up the “Auto-Correct Options” dialog. You do this by clicking the “Tools” menu and finding it near the bottom:
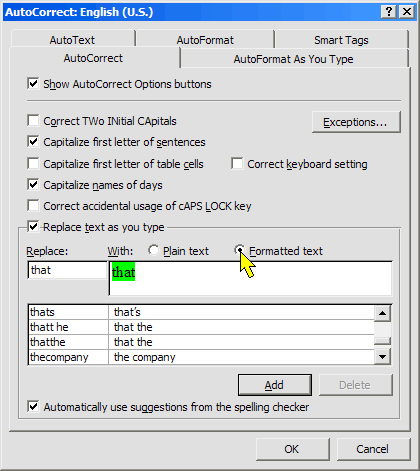
Then, when the dialog comes up, you will find the offending word already in the “With” textbox. You need to fill in the exact same word in the “Replace” textbox. The trick is to click the “Formatted Text” option before you click “Add”. This allows for the replaced text to be formatted bright green! The goal is to keep the word the same, but just change the formatting automatically.
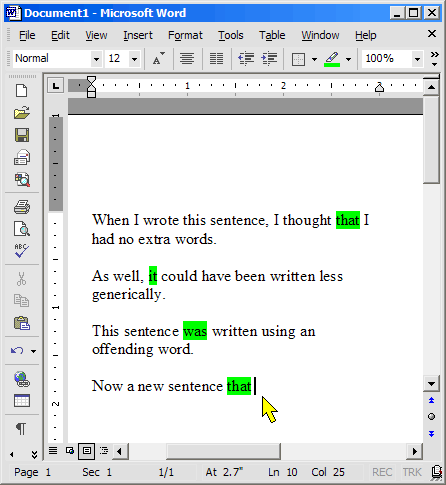
There! Now you have it setup. To test it, go ahead and type a sentence using the offending word. The moment you press the space bar after the word, it should turn bright green. Here is the victory screen-capture:
Unfortunately, AutoCorrect cannot catch “part of a word” … I wish I could catch every verb I type with “ing” in it, but alas, it can’t be done using AutoCorrect.
Another great benefit of AutoCorrect … I have found it incredibly helpful to put in shortcuts to all the names of my main characters. For instance, I can type “mm” and out pops “Morganthu”. Or how about “gg” to get “Garthwysik”? This feature alone can speed up your productivity and reduce your typos!
If anyone else has a great feature of Microsoft Word that has helped your writing, post it here in the comments, and if I find it useful, I’ll put a short tutorial together for it!
Oh! And by the way, a big thanks to the Genesis judge who helped me improve my writing!
Word 2007 Instructions
Now for those who use Word 2007 or later, here are my instructions on how to access the AutoCorrect feature. Unfortunately, the designers of the new menu system (which I absolutely LOATHE) forgot to make this available.
Thankfully the USE of the AutoCorrect features is still the same … so everything I said up above still applies.
But … there are still many ways to get at it.
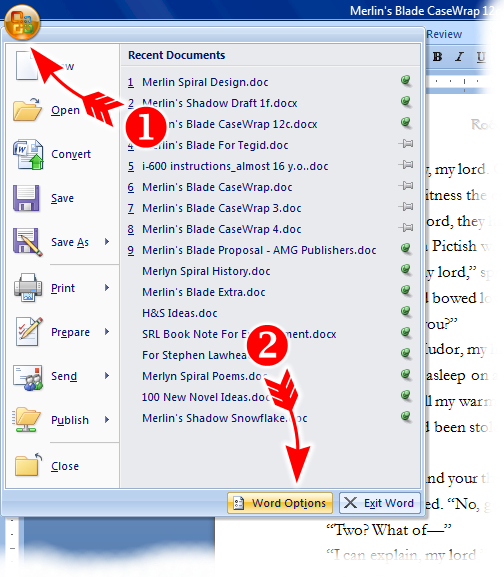
The simplest is through the “Word Options” dialog, accessed through the big, nameless, circle menu in the upper left corner. Click on it, and then click the “Word Options…” button in the lower right hand corner.
Like this:
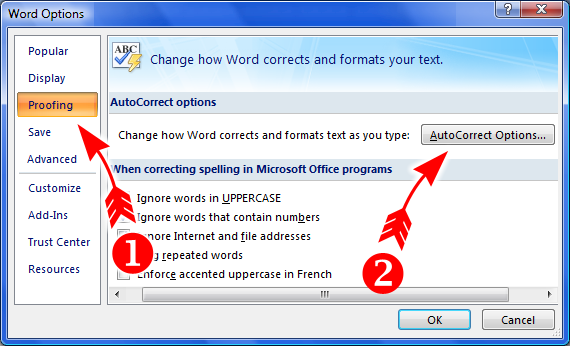
When the “Word Options” window appears, clikc “Proofing” in the left hand list. The “AutoCorrect Options…” button will be at the top left. Click it and you can make any changes you want.
But … if you want a faster way to access this dialog, you have to do some work to set it up.
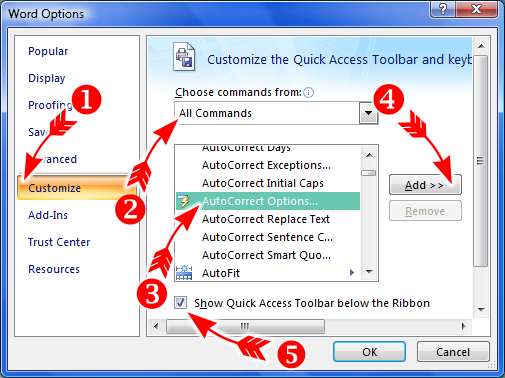
So … while you have the “Word Options” window open, the first step is to click “Customize” in the left hand list. This will allow you to add custom buttons to your “Quick Access Toolbar”.
To add the “AutoCorrect” button, you have to find it. So the my second instruction is for you to click “All Commands” from the dropdown list at the top center.
Third, find “AutoCorrect Options” in the list (notice the little lightning icon to its left).
Fourth … click the “Add >>” button in the middle. This will make it available on the “Quick Access Toolbar”.
And for the fifth and final step … to make the “Quick Access Toolbar” appear at a more natural spot, checkmark the “Show Quick Access Toolbar below the Ribbon”.
Anyway, see the image below to see the steps in order.
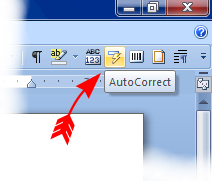
Now you just need to remember where the button is on your toolbar. Look for that same little lightning icon. On my toolbar it looks like this:
And one final trick if you like using the keyboard … you can STILL use the older keyboard shortcut to pop up the AutoCorrect window … hold down the ALT key, and then press “T”, and then “A”. Thankfully they preserved this keyboard shortcut!
If you have any questions, leave them in the comments.
Hi Robert
That’s a cool way of using AutoCorrect, and a good description of updating it. I thought you might like to know about a simpler way of managing your AutoCorrects by keeping them in a table in a Word document and adding and removing them from your AutoCorrect at will. This would allow you to “clean them out” when you move onto a different book, or even as you switch between different projects. I spent some time at Christmas working this out and it’s online at my website above. I call it the AutoCorrect Manager. It’s a Word document which brings up a form and lets you choose the document with your AutoCorrects in it and merge them in. You do need to keep the formatted (colourful) ones in one document, and the unformatted ones in another. It seems to work pretty well, and it takes the pain out of using the Word method above and remembering what you’ve already got in there.
Anyway, I hope this is of some interest to you or your readers.
Cheers
Michael
Michael,
Thanks for posting about your software … that certainly looks like an easier way to manage AutoCorrect than the clunky interface Microsoft has put together.
Readers of my blog: if you use AutoCorrect a lot, especially for multiple project where the entries conflict and/or differ, then I highly recommend Michael’s software.
-Robert
Hi Robert
Thanks for your kind comments.
Cheers
Michael